Introduction
Overview
Teaching: 5 min
Exercises: 5 minQuestions
What are containers?
Objectives
First learning objective.
Documentation
The official Docker documentation and tutorial can be found on the Docker website. It is quite thorough and useful. It is an excellent guide that should be routinely visited, but the emphasis of this introduction is on using Docker, not how Docker itself works.
A note up front, Docker has very similar syntax to Git and Linux, so if you are familiar with the command line tools for them then most of Docker should seem somewhat natural (though you should still read the docs!).
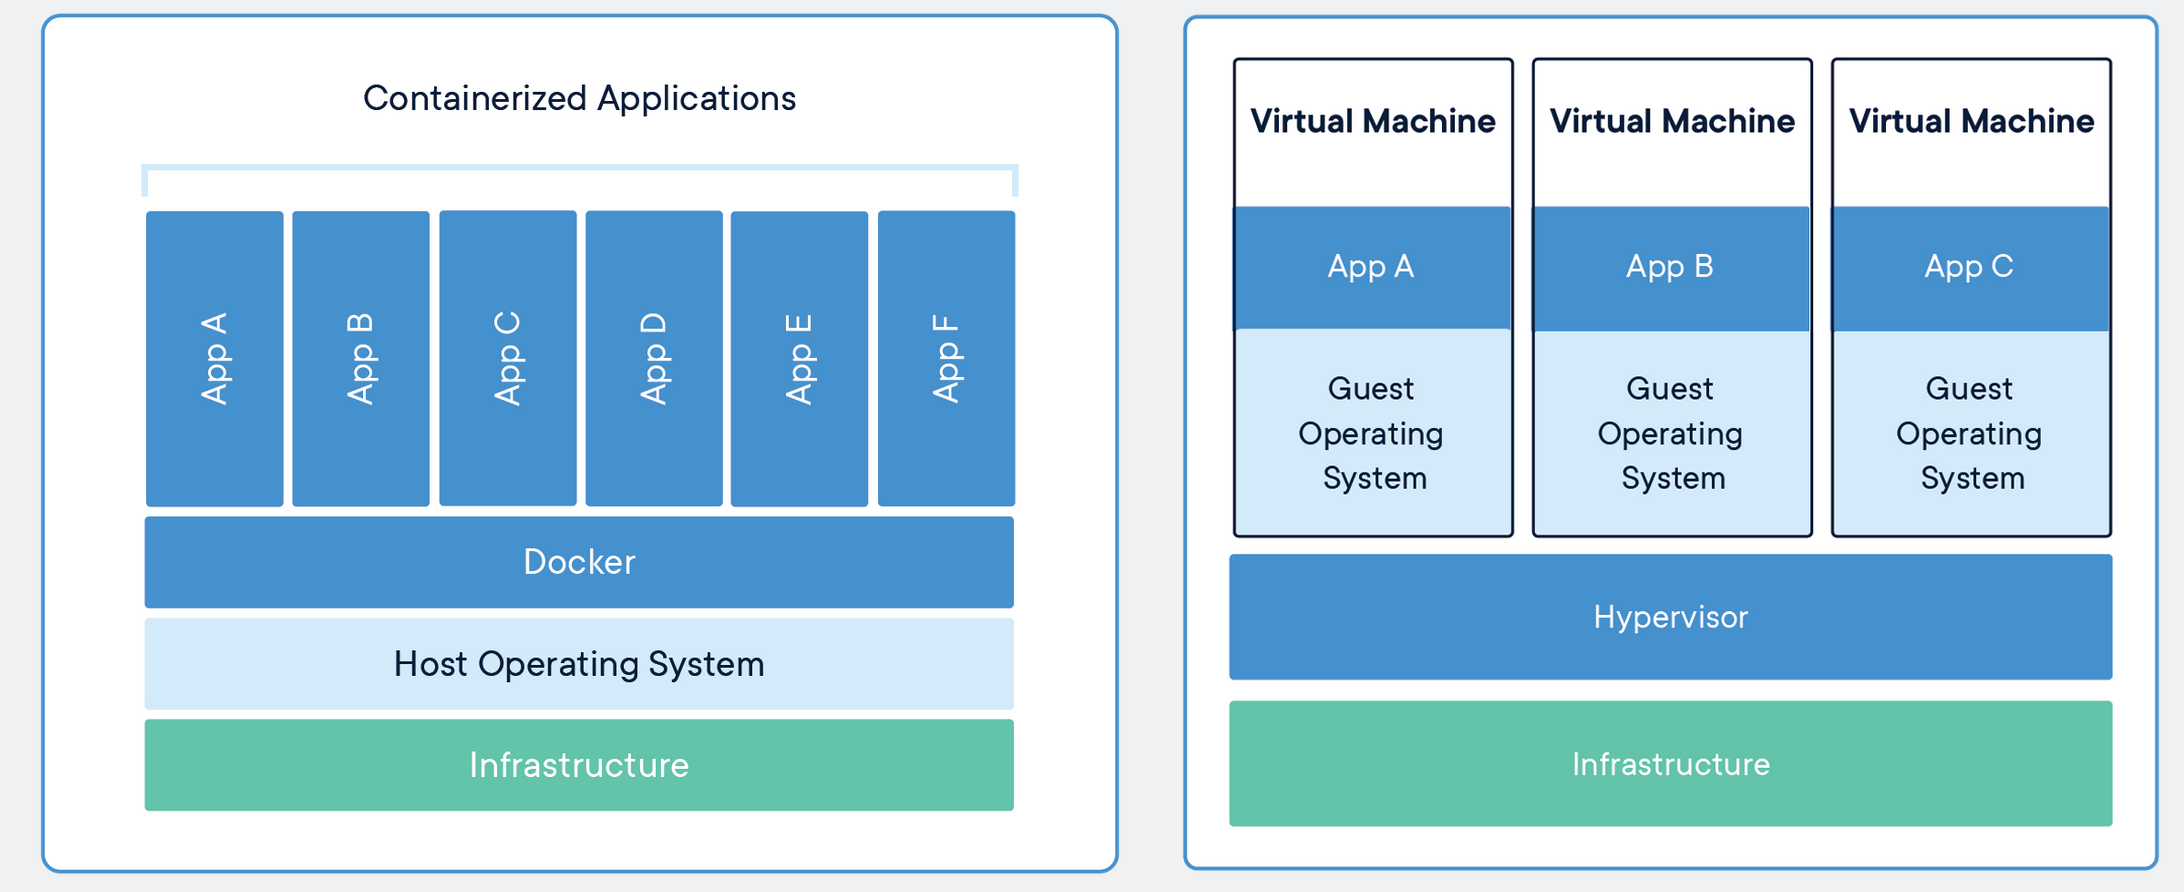
![]()
It is still important to know what Docker is and what the components of it are. Docker images are executables that bundle together all necessary components for an application or an environment. Docker containers are the runtime instances of images — they are images with a state.
Importantly, containers share the host machine’s OS system kernel and so don’t require an OS per application. As discrete processes containers take up only as much memory as necessary, making them very lightweight and fast to spin up to run.
Singularity
Docker is the most popular containerization tool these days, particularly in industry, but it’s not the only one. There are other kids on the block including Rocket and Singularity which are in use, but just haven’t gained as much large-scale traction.
Singularity in particular is used widely in HPC, and particularly by CMS, so you may have need to familiarize yourself with it at some point.
To learn more about singularity, see for example the HSF Training Singularity Module.
Key Points
Introduces docker- a tool for software containerization.
Pulling Images
Overview
Teaching: 10 min
Exercises: 5 minQuestions
How are images downloaded?
How are images distinguished?
Objectives
Pull images from Docker Hub image registry
List local images
Introduce image tags
Docker Hub
Much like GitHub allows for web hosting and searching for code, the Docker Hub image registry allows the same for Docker images. Hosting images is free for public repositories and allows for downloading images as they are needed. Additionally, you can configure your GitLab or GitHub CI pipelines to automatically build and push docker images to Docker Hub.
Pulling Images
To begin with we’re going to pull down the Docker image we’re going to be working in for the tutorial (note: if you did all the docker pulls in the setup instructions, this image will already be on your machine, in which case docker should notice it’s there and not attempt to re-pull it unless it’s changed in the meantime):
docker pull matthewfeickert/intro-to-docker
Permission errors
If you run into a permission error, use
sudo docker run ...as a quick fix. To fix this for the future (recommended), see the docker docs.
and then list the images that we have available to us locally
docker images
If you have many images and want to get information on a particular one you can apply a filter, such as the repository name
docker images matthewfeickert/intro-to-docker
REPOSITORY                        TAG                 IMAGE ID            CREATED             SIZE
matthewfeickert/intro-to-docker   latest              cf6508749ee0        3 months ago        1.49GB
or more explicitly
docker images --filter=reference="matthewfeickert/intro-to-docker"
REPOSITORY                        TAG                 IMAGE ID            CREATED             SIZE
matthewfeickert/intro-to-docker   latest              cf6508749ee0        3 months ago        1.49GB
You can see here that there is the TAG field associated with the
matthewfeickert/intro-to-docker image.
Tags are a way of further specifying different versions of the same image.
As an example, let’s pull the buster release tag of the
Debian image (again, if it was already pulled during setup, docker won’t attempt to re-pull it unless it’s changed since last pulled).
docker pull debian:buster
docker images debian
buster: Pulling from library/debian
<some numbers>: Pull complete
Digest: sha256:<the relevant SHA hash>
Status: Downloaded newer image for debian:buster
docker.io/library/debian:buster

REPOSITORY          TAG                 IMAGE ID            CREATED             SIZE
debian              buster              00bf7fdd8baf        5 weeks ago         114MB
Pulling Python
Pull the image python3.7-slim for Python 3.7 and then list all
pythonimages along with thematthewfeickert/intro-to-dockerimageSolution
docker pull python:3.7-slim
docker images --filter=reference="matthewfeickert/intro-to-docker" --filter=reference="python"
REPOSITORY TAG IMAGE ID CREATED SIZE python 3.7 e440e2151380 23 hours ago 918MB matthewfeickert/intro-to-docker latest cf6508749ee0 3 months ago 1.49GB
Key Points
Pull images with
docker pull <image-id>List all images on the computer and other information with
docker imagesImage tags distinguish releases or version and are appended to the image name with a colon
Running Containers
Overview
Teaching: 15 min
Exercises: 5 minQuestions
How are containers run?
How do you monitor containers?
How are containers exited?
How are containers restarted?
Objectives
Run containers
Understand container state
Stop and restart containers
To use a Docker image as a particular instance on a host machine you run it as a container. You can run in either a detached or foreground (interactive) mode.
Run the image we pulled as a container with an interactive bash terminal:
docker run -it matthewfeickert/intro-to-docker:latest /bin/bash
The -i option here enables the interactive session, the -t option gives access to a terminal and the /bin/bash command makes the container start up in a bash session.
You are now inside the container in an interactive bash session. Check the file directory
pwd
/home/docker/data
and check the host to see that you are not in your local host system
hostname
<generated hostname>
Further, check the os-release to see that you are actually inside a release of Debian
(given the Docker Library’s Python image Dockerfile choices)
cat /etc/os-release
PRETTY_NAME="Debian GNU/Linux 11 (bullseye)"
NAME="Debian GNU/Linux"
VERSION_ID="11"
VERSION="11 (bullseye)"
VERSION_CODENAME=bullseye
ID=debian
HOME_URL="https://www.debian.org/"
SUPPORT_URL="https://www.debian.org/support"
BUG_REPORT_URL="https://bugs.debian.org/"
Monitoring Containers
Open up a new terminal tab on the host machine and list the containers that are currently running
docker ps
CONTAINER ID        IMAGE         COMMAND             CREATED             STATUS              PORTS               NAMES
<generated id>      <image:tag>   "/bin/bash"         n minutes ago       Up n minutes                            <generated name>
Notice that the name of your container is some randomly generated name. To make the name more helpful, rename the running container
docker rename <CONTAINER ID> my-example
and then verify it has been renamed
docker ps
CONTAINER ID        IMAGE         COMMAND             CREATED             STATUS              PORTS               NAMES
<generated id>      <image:tag>   "/bin/bash"         n minutes ago       Up n minutes                            my-example
Renaming by name
You can also identify containers to rename by their current name
docker rename <NAME> my-example
Alternatively, you can also give the container a name at creation, using the --name option:
docker run -it --name my-fancy-name matthewfeickert/intro-to-docker:latest /bin/bash
This way, it has a custom chosen name to start with, which you can use later on to interact with it.
Exiting and restarting containers
As a test, go back into the terminal used for your container, and create a file in the container
touch test.txt
In the container exit at the command line
exit
You are returned to your shell. If you list the containers you will notice that none are running
docker ps
CONTAINER ID IMAGE COMMAND CREATED STATUS PORTS NAMES
but you can see all containers that have been run and not removed with
docker ps -a
CONTAINER ID        IMAGE         COMMAND             CREATED            STATUS                     PORTS               NAMES
<generated id>      <image:tag>   "/bin/bash"         n minutes ago      Exited (0) t seconds ago                       my-example
To restart your exited Docker container start it again and then attach it interactively to your shell
docker start <CONTAINER ID>
docker attach <CONTAINER ID>
execcommandThe attach command used here is a handy shortcut to interactively access a running container with the same start command (in this case
/bin/bash) that it was originally run with.In case you’d like some more flexibility, the exec command lets you run any command in the container, with options similar to the run command to enable an interactive (
-i) session, etc.For example, the
execequivalent toattaching in our case would look like:docker start <CONTAINER ID> docker exec -it <CONTAINER ID> /bin/bash
Starting and attaching by name
You can also start and attach containers by their name
docker start <NAME>
docker attach <NAME>
Notice that your entry point is still /home/docker/data and then check that your
test.txt still exists
ls
test.txt
So this shows us that we can exit Docker containers for arbitrary lengths of time and then return to our working environment inside of them as desired.
Clean up a container
If you want a container to be cleaned up — that is deleted — after you exit it then run with the
--rmoption flagdocker run --rm -it <IMAGE> /bin/bash
Key Points
Run containers with
docker run <image-id>Monitor containers with
docker psExit interactive sessions using the
exitcommandRestart stopped containers with
docker start
File I/O with Containers
Overview
Teaching: 15 min
Exercises: 5 minQuestions
How do containers interact with my local file system?
Objectives
Copy files to and from the docker container
Mount directories to be accessed and manipulated by the docker container
Copying
Copying files between the local host and Docker containers is possible. On your local host, either find a file that you want to transfer to the container or create a new one. Below is the procedure for creating a new file called io_example.txt and then copying it to the container:
touch io_example.txt
# If on Mac need to do: chmod a+w io_example.txt
echo "This was written on local host" > io_example.txt
docker cp io_example.txt <NAME>:/home/docker/data/
and then from the container check and modify it in some way
pwd
ls
cat io_example.txt
echo "This was written inside Docker" >> io_example.txt
Permission issues
If you run into a
Permission deniederror, there is a simple and quick fix:exit # exit container chmod a+w io_example.txt # add write permissions for all usersAnd continue from the
docker cp ...command above.
/home/docker/data
io_example.txt
This was written on local host
and then on the local host copy the file out of the container
docker cp <NAME>:/home/docker/data/io_example.txt .
and verify if you want that the file has been modified as you wanted
cat io_example.txt
This was written on local host
This was written inside Docker
Volume mounting
What is more common and arguably more useful is to mount volumes to
containers with the -v flag.
This allows for direct access to the host file system inside of the container and for
container processes to write directly to the host file system.
docker run -v <path on host>:<path in container> <image>
For example, to mount your current working directory ($PWD) on your local machine to the data
directory in the example container
docker run --rm -it -v $PWD:/home/docker/data matthewfeickert/intro-to-docker
From inside the container you can ls to see the contents of your directory on your local
machine
ls
and yet you are still inside the container
pwd
/home/docker/data
You can also see that any files created in this path in the container persist upon exit
touch created_inside.txt
exit
ls *.txt
Permission issues
If you are using Linux with SELinux enabled, you might run into a
Permission deniederror. Note that SELinux is enabled if the output of the commandgetenforce statusisEnforcing. To fix the permission issue, append:z(lowercase!) at the end of the mount option, like this:docker run --rm -it -v $PWD:/home/docker/data:z ...If this still does not fix the issue you can disable SELinux by running
sudo setenforce 0, or you can try usingsudoto execute docker commands, but both of these methods are not recommended.
created_inside.txt
This I/O allows for Docker images to be used for specific tasks that may be difficult to do with the tools or software installed on only the local host machine. For example, debugging problems with software that arise on cross-platform software, or even just having a specific version of software perform a task (e.g., using Python 2 when you don’t want it on your machine, or using a specific release of TeX Live when you aren’t ready to update your system release).
Key Points
Copy files with
docker cpMount volumes with
docker run -v <path on host>:<path in container> <image>
Writing Dockerfiles and Building Images
Overview
Teaching: 20 min
Exercises: 10 minQuestions
How are Dockerfiles written?
How are Docker images built?
Objectives
Write simple Dockerfiles
Build a Docker image from a Dockerfile
Docker images are built through the Docker engine by reading the instructions from a
Dockerfile.
These text based documents provide the instructions through an API similar to the Linux
operating system commands to execute commands during the build.
The Dockerfile for the example image being used is an example of
some simple extensions of the official Python 3.9 Docker image based on Debian Bullseye (python:3.9-bullseye).
As a very simple example of extending the example image into a new image create a Dockerfile
on your local machine
touch Dockerfile
and then write in it the Docker engine instructions to add cowsay and
scikit-learn to the environment
# Dockerfile

# Specify the base image that we're building the image on top of
FROM matthewfeickert/intro-to-docker:latest

# Build the image as root user
USER root

# Run some bash commands to install packages
RUN apt-get -qq -y update && \
    apt-get -qq -y upgrade && \
    apt-get -qq -y install cowsay && \
    apt-get -y autoclean && \
    apt-get -y autoremove && \
    rm -rf /var/lib/apt-get/lists/* && \
    ln -s /usr/games/cowsay /usr/bin/cowsay
RUN pip install --no-cache-dir -q scikit-learn

# This sets the default working directory when a container is launched from the image
WORKDIR /home/docker

# Run as docker user by default when the container starts up
USER docker
Dockerfile layers (or: why all these ‘&&’s??)
Each
RUNcommand in a Dockerfile creates a new layer to the Docker image. In general, each layer should try to do one job and the fewer layers in an image the easier it is compress. This is why you see all these ‘&& 's in theRUNcommand, so that all the shell commands will take place in a single layer. When trying to upload and download images on demand the smaller the size the better.Another thing to keep in mind is that each
RUNcommand occurs in its own shell, so any environment variables, etc. set in oneRUNcommand will not persist to the next.
Garbage cleanup
Notice that the last few lines of the
RUNcommand clean up and remove unneeded files that get produced during the installation process. This is important for keeping image sizes small, since files produced during each image-building layer will persist into the final image and add unnecessary bulk.
Don’t run as
rootBy default Docker containers will run as
root. This is a bad idea and a security concern. Instead, setup a default user (likedockerin the example) and if needed give the user greater privileges.
Then build an image from the Dockerfile and tag it with a human
readable name
docker build -f Dockerfile -t extend-example:latest .
You can now run the image as a container and verify for yourself that your additions exist
docker run --rm -it extend-example:latest /bin/bash
which cowsay
cowsay "Hello from Docker"
pip list | grep scikit
python3 -c "import sklearn as sk; print(sk)"
/usr/bin/cowsay
 ___________________
< Hello from Docker >
 -------------------
        \   ^__^
         \  (oo)\_______
            (__)\       )\/\
                ||----w |
                ||     ||

scikit-learn        1.3.1
<module 'sklearn' from '/usr/local/lib/python3.9/site-packages/sklearn/__init__.py'>
Tags
In the examples so far the built image has been tagged with a single tag (e.g. latest).
However, tags are simply arbitrary labels meant to help identify images and images can
have multiple tags.
New tags can be specified in the docker build command by giving the -t flag multiple
times or they can be specified after an image is built by using
docker tag.
docker tag <SOURCE_IMAGE[:TAG]> <TARGET_IMAGE[:TAG]>
Add your own tag
Using
docker tagadd a new tag to the image you built.Solution
docker images extend-example
docker tag extend-example:latest extend-example:my-tag
docker images extend-example
REPOSITORY TAG IMAGE ID CREATED SIZE extend-example latest b571a34f63b9 t seconds ago 1.59GB REPOSITORY TAG IMAGE ID CREATED SIZE extend-example latest b571a34f63b9 t seconds ago 1.59GB extend-example my-tag b571a34f63b9 t seconds ago 1.59GB
Tags are labels
Note how the image ID didn’t change for the two tags: they are the same object. Tags are simply convenient human readable labels.
COPY
Docker also gives you the ability to copy external files into a Docker image during the
build with the COPY Dockerfile command.
Which allows copying a target file from a host file system into the Docker image
file system
COPY <path on host> <path in Docker image>
For example, if there is a file called install_python_deps.sh in the same directory as
the build is executed from
touch install_python_deps.sh
with contents
cat install_python_deps.sh
#!/usr/bin/env bash

set -e

pip install --upgrade --no-cache-dir pip setuptools wheel
pip install --no-cache-dir -q scikit-learn
then this could be copied into the Docker image of the previous example during the build and then used (and then removed as it is no longer needed).
Create a new file called Dockerfile.copy:
touch Dockerfile.copy
and fill it with a modified version of the above Dockerfile, where we now copy install_python_deps.sh from the local working directory into the container and use it to install the specified python dependencies:
# Dockerfile.copy
FROM matthewfeickert/intro-to-docker:latest
USER root
RUN apt-get -qq -y update && \
    apt-get -qq -y upgrade && \
    apt-get -qq -y install cowsay && \
    apt-get -y autoclean && \
    apt-get -y autoremove && \
    rm -rf /var/lib/apt-get/lists/* && \
    ln -s /usr/games/cowsay /usr/bin/cowsay
COPY install_python_deps.sh install_python_deps.sh
RUN bash install_python_deps.sh && \
    rm install_python_deps.sh
WORKDIR /home/data
USER docker
docker build -f Dockerfile.copy -t copy-example:latest .
For very complex scripts or files that are on some remote, COPY offers a straightforward
way to bring them into the Docker build.
Key Points
Dockerfiles are written as text file commands to the Docker engine
Docker images are built with
docker buildDocker images can have multiple tags associated to them
Docker images can use
COPYto copy files into them during build
Removal of Containers and Images
Overview
Teaching: 5 min
Exercises: 5 minQuestions
How do you cleanup old containers?
How do you delete images?
Objectives
Learn how to cleanup after Docker
You can cleanup/remove a container docker rm
docker rm <CONTAINER NAME>
Remove old containers
Start an instance of the tutorial container, exit it, and then remove it with
docker rmSolution
docker run matthewfeickert/intro-to-docker:latest
docker ps -a
docker rm <CONTAINER NAME>
docker ps -a
CONTAINER ID IMAGE COMMAND CREATED STATUS PORTS NAMES <generated id> <image:tag> "/bin/bash" n seconds ago Exited (0) t seconds ago <name> <generated id> CONTAINER ID IMAGE COMMAND CREATED STATUS PORTS NAMES
You can remove an image from your computer entirely with docker rmi
docker rmi <IMAGE ID>
Remove an image
Pull down the Python 2.7 image (2.7-slim tag) from Docker Hub and then delete it.
Solution
docker pull python:2.7-slim
docker images python
docker rmi <IMAGE ID>
docker images python
2.7: Pulling from library/python <some numbers>: Pull complete <some numbers>: Pull complete <some numbers>: Pull complete <some numbers>: Pull complete <some numbers>: Pull complete <some numbers>: Pull complete <some numbers>: Pull complete <some numbers>: Pull complete Digest: sha256:<the relevant SHA hash> Status: Downloaded newer image for python:2.7-slim docker.io/library/python:2.7-slim REPOSITORY TAG IMAGE ID CREATED SIZE python 2.7-slim d75b4eed9ada 14 hours ago 886MB python 3.7-slim e440e2151380 23 hours ago 918MB Untagged: python@sha256:<the relevant SHA hash> Deleted: sha256:<layer SHA hash> Deleted: sha256:<layer SHA hash> Deleted: sha256:<layer SHA hash> Deleted: sha256:<layer SHA hash> Deleted: sha256:<layer SHA hash> Deleted: sha256:<layer SHA hash> Deleted: sha256:<layer SHA hash> Deleted: sha256:<layer SHA hash> Deleted: sha256:<layer SHA hash> Deleted: sha256:<layer SHA hash> REPOSITORY TAG IMAGE ID CREATED SIZE python 3.7-slim e440e2151380 23 hours ago 918MB
Helpful cleanup commands
What is helpful is to have Docker detect and remove unwanted images and containers for you. This can be done with
prune, which depending on the context will remove different things.
docker container pruneremoves all stopped containers, which is helpful to clean up forgotten stopped containers.docker image pruneremoves all unused or dangling images (images that do not have a tag). This is helpful for cleaning up after builds.docker system pruneremoves all stopped containers, dangling images, and dangling build caches. This is very helpful for cleaning up everything all at once.
Key Points
Remove containers with
docker rm <CONTAINER NAME>Remove images with
docker rmi <IMAGE ID>Perform faster cleanup with
docker container prune,docker image prune, anddocker system prune
Coffee break
Overview
Teaching: 0 min
Exercises: 15 minQuestions
Coffee or tea?
Objectives
Refresh your mental faculties with coffee and conversation


Key Points
Breaks are helpful in the service of learning
Gitlab CI for Automated Environment Preservation
Overview
Teaching: 20 min
Exercises: 25 minQuestions
How can gitlab CI and docker work together to automatically preserve my analysis environment?
What do I need to add to my gitlab repo(s) to enable this automated environment preservation?
Objectives
Learn how to write a Dockerfile to containerize your analysis code and environment.
Understand what needs to be added to your
.gitlab-ci.ymlfile to keep the containerized environment continuously up to date for your repo.
Introduction
In this section, we learn how to combine the forces of docker and gitlab CI to automatically keep your analysis environment up-to-date. This is accomplished by adding an extra stage to the CI pipeline for each analysis repo, which builds a container image that includes all aspects of the environment needed to run the code.
We will be doing this using the CMS OpenData HTauTau Analysis Payload. Specifically, we will be using two “snapshots” of this code which are the repositories described on the setup page of this training. A walkthrough of how to setup those repositories can also be found on this video. The “snapshot” repositories are available on GitHub (skimmer repository and statistics repository ). If you don’t already have this setup, take a detour now and watch that video and revisit the setup page.
Writing your Dockerfile
The goal of automated environment preservation is to create a docker image that you can immediately start executing your analysis code inside upon startup. Let’s review the needed components for this.
- Set up the OS, system libraries, and other dependencies that your code depends on,
- Add your analysis code to the container, and
- Build the code so that it can just be executed trivially inside the container.
As we’ve seen, all these components can be encoded in a Dockerfile. So the first step to set up automated image building is to add a Dockerfile to the repo specifying these components.
The
rootproject/rootdocker imageIn this tutorial, we build our analysis environments on top of the
rootproject/rootbase image (link to project area on docker hub) with conda. This image comes with root 6.22 and python 3.8 pre-installed. It also comes with XrootD for downloading files from eos. Therootproject/rootis itself built with a Dockerfile, which uses conda to install root and python on top of another base image (condaforge/miniforge3).
Exercise (15 min)
Working from your bash shell, cd into the top level of the repo you use for skimming, that being the “event selection” snapshot of the CMS HTauTau analysis payload. Create an empty file named
Dockerfile.touch DockerfileNow open the Dockerfile with a text editor and, starting with the following skeleton, fill in the FIXMEs to make a Dockerfile that fully specifies your analysis environment in this repo.
# Start from the rootproject/root:6.22.06-conda base image
[FIXME]

# Put the current repo (the one in which this Dockerfile resides) in the /analysis/skim directory
# Note that this directory is created on the fly and does not need to reside in the repo already
[FIXME]

# Make /analysis/skim the default working directory (again, it will create the directory if it doesn't already exist)
[FIXME]

# Compile an executable named 'skim' from the skim.cxx source file
RUN echo ">>> Compile skimming executable ..." &&  \
    COMPILER=[FIXME] && \
    FLAGS=[FIXME] && \
    [FIXME]
Hint: have a look at
skim.shif you are unsure about how to complete the lastRUNstatement!Solution
# Start from the rootproject/root base image with conda
FROM rootproject/root:6.22.06-conda

# Put the current repo (the one in which this Dockerfile resides) in the /analysis/skim directory
# Note that this directory is created on the fly and does not need to reside in the repo already
COPY . /analysis/skim

# Make /analysis/skim the default working directory (again, it will create the directory if it doesn't already exist)
WORKDIR /analysis/skim

# Compile an executable named 'skim' from the skim.cxx source file
RUN echo ">>> Compile skimming executable ..." &&  \
COMPILER=$(root-config --cxx) &&  \
FLAGS=$(root-config --cflags --libs) &&  \
$COMPILER -g -std=c++11 -O3 -Wall -Wextra -Wpedantic -o skim skim.cxx $FLAGS
Once you’re happy with your Dockerfile, you can commit it to your repo and push it to github.
Hints
As you’re working, you can test whether the Dockerfile builds successfully using the
docker buildcommand. Eg.docker build -t payload_analysis .When your image builds successfully, you can
runit and poke around to make sure it’s set up exactly as you want, and that you can successfully run the executable you built:docker run -it --rm payload_analysis /bin/bash
Add docker building to your gitlab CI
Now, you can proceed with updating your .gitlab-ci.yml to actually build the container during the CI/CD pipeline and store it in the gitlab registry. You can later pull it from the gitlab registry just as you would any other container, but in this case using your CERN credentials.
Not from CERN?
If you do not have a CERN computing account with access to gitlab.cern.ch, then everything discussed here is also available on gitlab.com, which offers CI/CD tools, including the docker builder. Furthermore, you can achieve the same with GitHub + Github Container Registry. To learn more about these methods, see the next subsections.
Add the following lines at the end of the .gitlab-ci.yml file to build the image with Kaniko and save it to the docker registry.
For more details about building docker images on CERN’s GitLab, see the Building docker images docs page.
build_image:
  stage: build
  variables:
    IMAGE_DESTINATION: $CI_REGISTRY_IMAGE:$CI_COMMIT_REF_SLUG-$CI_COMMIT_SHORT_SHA
  image:
    # The kaniko debug image is recommended because it has a shell, and a shell is required for an image to be used with GitLab CI/CD.
    name: gcr.io/kaniko-project/executor:debug
    entrypoint: [""]
  script:
    # Prepare Kaniko configuration file
    - echo "{\"auths\":{\"$CI_REGISTRY\":{\"username\":\"$CI_REGISTRY_USER\",\"password\":\"$CI_REGISTRY_PASSWORD\"}}}" > /kaniko/.docker/config.json
    # Build and push the image from the Dockerfile at the root of the project.
    - /kaniko/executor --context $CI_PROJECT_DIR --dockerfile $CI_PROJECT_DIR/Dockerfile --destination $IMAGE_DESTINATION
    # Print the full registry path of the pushed image
    - echo "Image pushed successfully to ${IMAGE_DESTINATION}"
Once this is done, you can commit and push the updated .gitlab-ci.yml file to your gitlab repo and check to make sure the pipeline passed. If it passed, the repo image built by the pipeline should now be stored on the docker registry, and be accessible as follows:
docker login gitlab-registry.cern.ch
docker pull gitlab-registry.cern.ch/[repo owner's username]/[skimming repo name]:[branch name]-[shortened commit SHA]
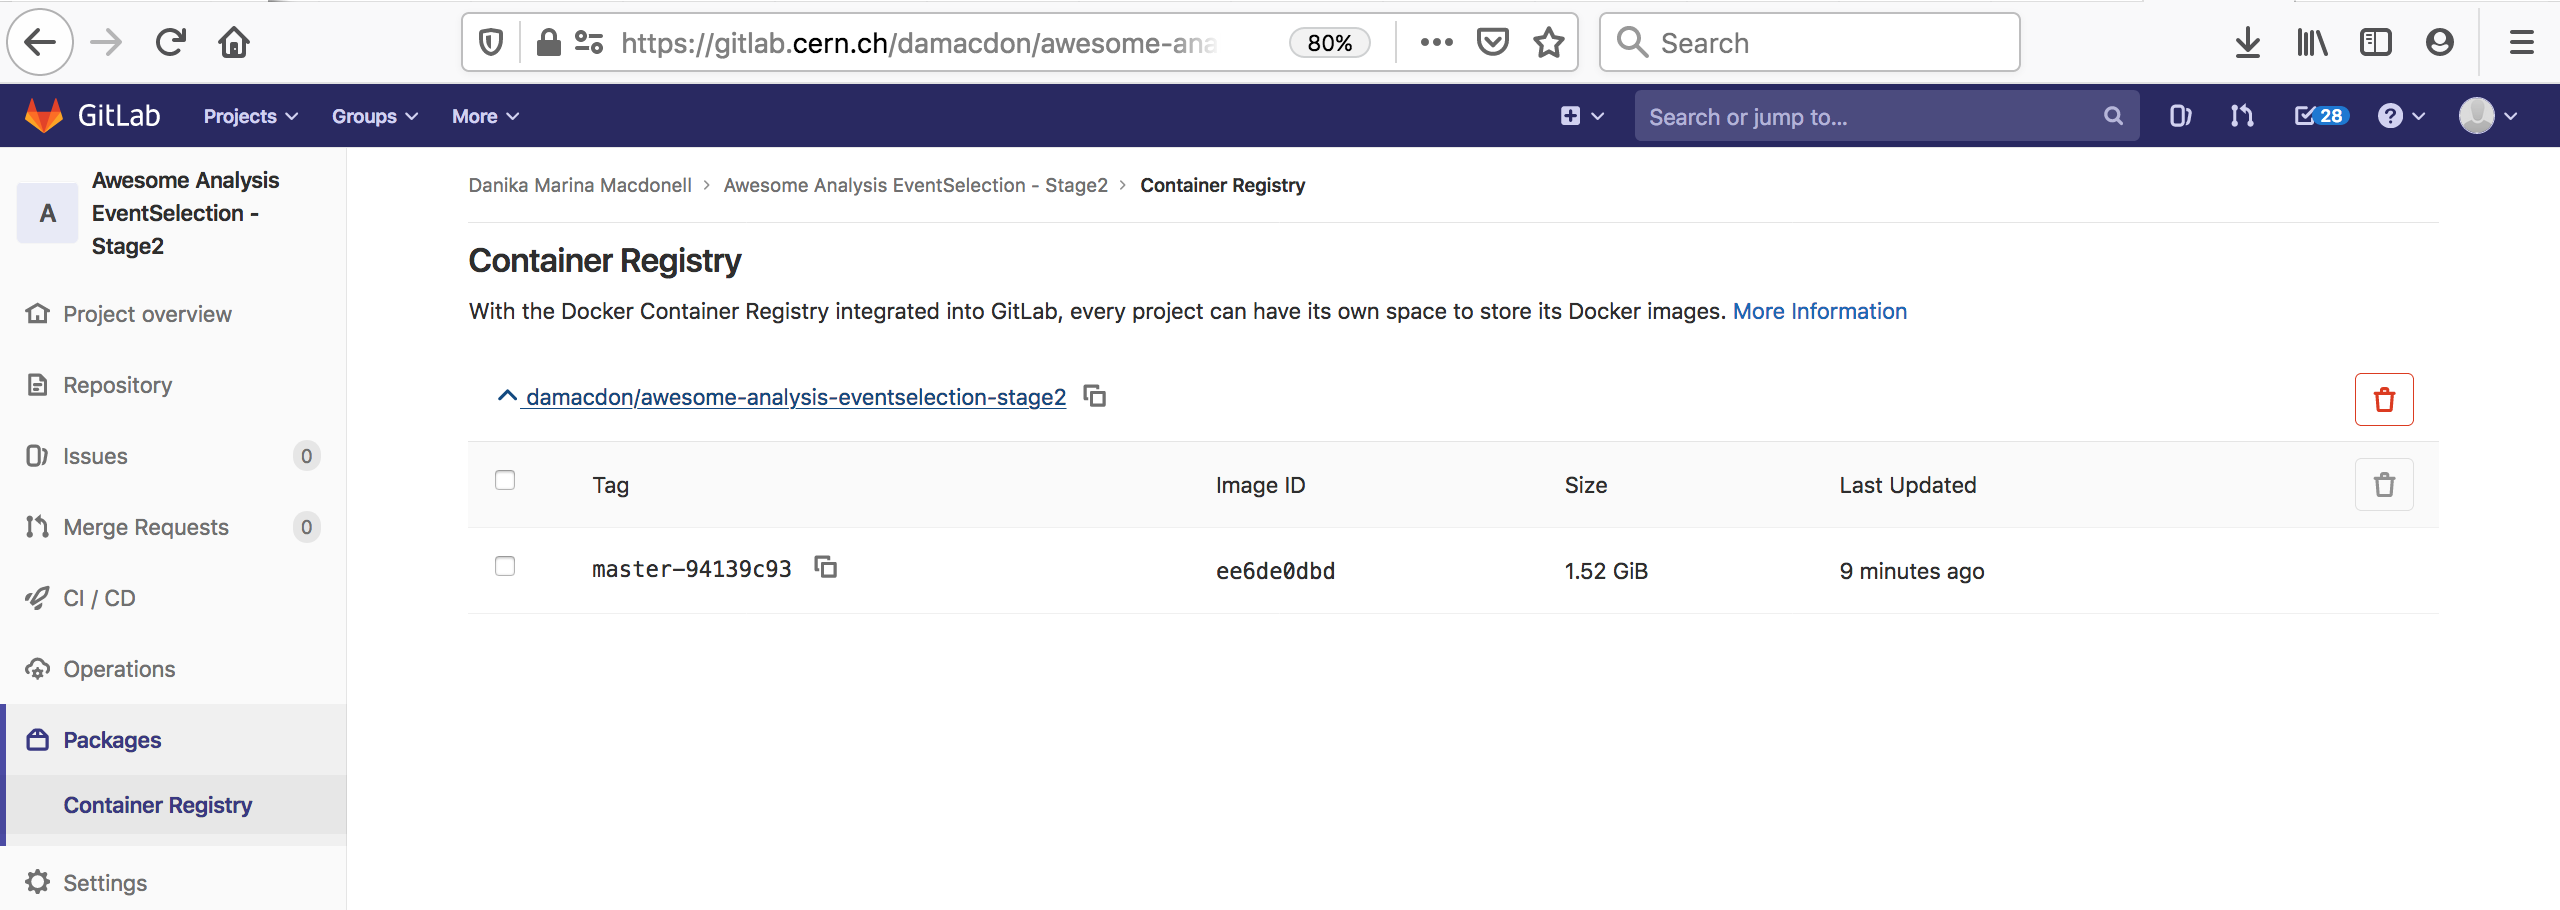
You can also go to the container registry on the gitlab UI to see all the images you’ve built:
Notice that the script to run is just a dummy ‘ignore’ command. This is because using the docker-image-build tag, the jobs always land on special runners that are managed by CERN IT which run a custom script in the background. You can safely ignore the details.
Recommended Tag Structure
You’ll notice the environment variable
IMAGE_DESTINATIONin the.gitlab-ci.ymlscript above. This controls the name of the Docker image that is produced in the CI step. Here, the image name will be<reponame>:<branch or tagname>-<short commit SHA>. The shortened 8-character commit SHA ensures that each image created from a different commit will be unique, and you can easily go back and find images from previous commits for debugging, etc.As you’ll see tomorrow, it’s recommended when using your images as part of a REANA workflow to make a unique image for each gitlab commit, because REANA will only attempt to update an image that it’s already pulled if it sees that there’s a new tag associated with the image.
If you feel it’s overkill for your specific use case to save a unique image for every commit, the
-$CI_COMMIT_SHORT_SHAcan be removed. Then the$CI_COMMIT_REF_SLUGwill at least ensure that images built from different branches will not overwrite each other, and tagged commits will correspond to tagged images.
Alternative: GitLab.com
This training module is rather CERN-centric and assumes you have a CERN computing account with access to gitlab.cern.ch. If this is not the case, then as with the CICD training module, everything can be carried out using gitlab.com with a few slight modifications.
In particular, you will have to specify that your pipeline job that builds the image is executed on a special type of runner with the appropriate services. However, unlike at CERN, you can use the docker commands that you have seen in the previous episodes to build and push the docker images.
Add the following lines at the end of the .gitlab-ci.yml file to build the image and save it to the docker registry.
build_image:
  stage: build
  image: docker:latest
  services:
    - docker:dind
  variables:
    IMAGE_DESTINATION: $CI_REGISTRY_IMAGE:$CI_COMMIT_REF_SLUG-$CI_COMMIT_SHORT_SHA
  script:
    - docker build -t $IMAGE_DESTINATION .
    - docker login -u $CI_REGISTRY_USER -p $CI_REGISTRY_PASSWORD $CI_REGISTRY
    - docker push $IMAGE_DESTINATION
In this job, the specific image: docker:latest, along with specifying the services to contain docker:dind are needed to be able to execute docker commands. If you are curious to read about this in detail, refer to the official gitlab documentation or this example.
In the script of this job there are three components :
docker build: This is performing the same build of our docker image to the tagged image which we will call<reponame>:<branch or tagname>-<short commit SHA>docker login: This call is performing an authentication of the user to the gitlab registry using a set of predefined environment variables that are automatically available in any gitlab repository.docker push: This call is pushing the docker image which exists locally on the runner to the gitlab.com registry associated with the repository against which we have performed the authentication in the previous step.
If the job runs successfully, then in the same way as described for gitlab.cern.ch in the previous section, you will be able to find the Container Registry on the left hand icon menu of your gitlab.com web browser and navigate to the image that was pushed to the registry. Et voila, c’est fini, exactement comme au CERN!
Alternative: GitHub.com
You can also build Docker images on github.com and push them to the GitHub Container Registry (ghcr.io) with the help of GitHub Actions. The bonus episode Building and deploying a Docker container to Github Packages explains how to do so.
An updated version of skim.sh
Exercise (10 mins)
Since we’re now taking care of building the skimming executable during image building, let’s make an updated version of
skim.shthat excludes the step of building theskimexecutable.The updated script should just directly run the pre-existing
skimexecutable on the input samples. You could call it eg.skim_prebuilt.sh. We’ll be using this updated script in an exercise later on in which we’ll be going through the full analysis in containers launched from the images we create with gitlab CI.Once you’re happy with the script, you can commit and push it to the repo.
Solution
#!/bin/bash

INPUT_DIR=$1
OUTPUT_DIR=$2

# Sanitize input path, XRootD breaks if we double accidentally a slash
if [ "${INPUT_DIR: -1}" = "/" ];
then
INPUT_DIR=${INPUT_DIR::-1}
fi

# Skim samples
while IFS=, read -r SAMPLE XSEC
do
echo ">>> Skim sample ${SAMPLE}"
INPUT=${INPUT_DIR}/${SAMPLE}.root
OUTPUT=${OUTPUT_DIR}/${SAMPLE}Skim.root
LUMI=11467.0 # Integrated luminosity of the unscaled dataset
SCALE=0.1 # Same fraction as used to down-size the analysis
./skim $INPUT $OUTPUT $XSEC $LUMI $SCALE
done < skim.csv
Key Points
gitlab CI allows you to re-build a container that encapsulates the environment each time new commits are pushed to the analysis repo.
This functionality is enabled by adding a Dockerfile to your repo that specifies how to build the environment, and an image-building stage to the
.gitlab-ci.ymlfile.
Running our Containerized Analysis
Overview
Teaching: 10 min
Exercises: 35 minQuestions
How do I run my full analysis chain inside docker containers?
Objectives
Try running your entire analysis workflow in containerized environments.
Gain an appreciation for the convenience of automating containerized workflows.
Introduction
To bring it all together, we can also preserve our fitting framework in its own docker image, then run our full analysis workflow within these containerized environments.
Preserve the Fitting Repo Environment
Exercise (10 min)
Just as we did for the analysis repo, cd into your the repo containing your statistical fitting code and create a Dockerfile to preserve the environment. You can again start from the
rootproject/root:6.22.06-condabase image.Note: Since the fitting code just runs a python script, there’s no need to pre-compile any executables in this Dockerfile. It’s sufficient to add the source code to the base image and make the directory containing the code your default working directory.’
Once you’re happy with the Dockerfile, commit and push the new file to the fitting repo.
Note: Since we’re now moving between repos, you can quickly double-check that you’re in the desired repo using eg.
git remote -v.Solution
FROM rootproject/root:6.22.06-conda
COPY . /fit
WORKDIR /fit
Exercise (5 min)
Now, add the same image-building stage to the
.gitlab-ci.ymlfile as we added for the skimming repo. You will also need to add a- buildstage at the top in addition to any other stages.Note: I would suggest listing the
- buildstage before the other stages so it will run first. This way, even if the other stages fail for whatever reason, the image can still be built with the- buildstage.Once you’re happy with the .gitlab-ci.yml, commit and push the new file to the fitting repo.
Solution
stages:
- build
- [... any other stages]

build_image:
  stage: build
  variables:
    IMAGE_DESTINATION: $CI_REGISTRY_IMAGE:$CI_COMMIT_REF_SLUG-$CI_COMMIT_SHORT_SHA
  image:
    # The kaniko debug image is recommended because it has a shell, and a shell is required for an image to be used with GitLab CI/CD.
    name: gcr.io/kaniko-project/executor:debug
    entrypoint: [""]
  script:
    # Prepare Kaniko configuration file
    - echo "{\"auths\":{\"$CI_REGISTRY\":{\"username\":\"$CI_REGISTRY_USER\",\"password\":\"$CI_REGISTRY_PASSWORD\"}}}" > /kaniko/.docker/config.json
    # Build and push the image from the Dockerfile at the root of the project.
    - /kaniko/executor --context $CI_PROJECT_DIR --dockerfile $CI_PROJECT_DIR/Dockerfile --destination $IMAGE_DESTINATION
    # Print the full registry path of the pushed image
    - echo "Image pushed successfully to ${IMAGE_DESTINATION}"

[... rest of .gitlab-ci.yml]
If the image-building completes successfully, you should be able to pull your fitting container, just as you did the skimming container:
docker login gitlab-registry.cern.ch
docker pull gitlab-registry.cern.ch/[repo owner's username]/[fitting repo name]:[branch name]-[shortened commit sha]
Running the Containerized Workflow
Now that we’ve preserved our full analysis environment in docker images, let’s try running the workflow in these containers all the way from input samples to final fit result. To add to the fun, you can try doing the analysis in a friend’s containers!
Friend Time Activity (20 min)
Part 1: Skimming
Make a directory, eg.
containerized_workflow, from which to do the analysis.cdinto the directory and make sub-directories to contain the skimming and fitting output:mkdir containerized_workflow cd containerized_workflow mkdir skimming_output mkdir fitting_outputFind a partner and pull the image they’ve built for their skimming repo from the gitlab registry. Launch a container using your partner’s image. Try to run the analysis code to produce the
histogram.rootfile that will get input to the fitting repo, using theskim_prebuilt.shscript we created in the previous lesson for the first skimming step. You can follow the skimming instructions in step 1 and step 2 of the README.Note: We’ll need to pass the output from the skimming stage to the fitting stage. To enable this, you can volume mount the
skimming_outputdirectory into the container. Then, as long as you save the skimming output to the volume-mounted location in the container, it will also be available locally underskimming_output.Part 2: Fitting
Now, pull your partner’s fitting image and use it to produce the final fit result. Remember to volume-mount the
skimming_outputandfitting_outputso the container has access to both. At the end, thefitting_outputdirectory on your local machine should contain the final fit results. You can follow the instructions in step 4 of the README.Solution
Part 1: Skimming
# Pull the image for the skimming repo
docker pull gitlab-registry.cern.ch/[your_partners_username]/[skimming repo name]:[branch name]-[shortened commit SHA]

# Start up the container and volume-mount the skimming_output directory into it
docker run --rm -it -v ${PWD}/skimming_output:/skimming_output gitlab-registry.cern.ch/[your_partners_username]/[skimming repo name]:[branch name]-[shortened commit SHA] /bin/bash

# Run the skimming code
bash skim_prebuilt.sh root://eospublic.cern.ch//eos/root-eos/HiggsTauTauReduced/ /skimming_output
bash histograms.sh /skimming_output /skimming_output
Part 2: Fitting
# Pull the image for the fitting repo
docker pull gitlab-registry.cern.ch/[your_partners_username]/[fitting repo name]:[branch name]-[shortened commit SHA]

# Start up the container and volume-mount the skimming_output and fitting_output directories into it
docker run --rm -it -v ${PWD}/skimming_output:/skimming_output -v ${PWD}/fitting_output:/fitting_output gitlab-registry.cern.ch/[your_partners_username]/[fitting repo name]:[branch name]-[shortened commit SHA] /bin/bash

# Run the fitting code
bash fit.sh /skimming_output/histograms.root /fitting_output
Containerized Workflow Automation
At this point, you may already have come to appreciate that it could get a bit tedious having to manually start up the containers and keep track of the mounted volumes every time you want to develop and test your containerized workflow. It would be pretty nice to have something to automate all of this.
Fortunately, containerized workflow automation tools such as yadage have been developed to do exactly this. Yadage was developed by Lukas Heinrich specifically for HEP applications, and is now used widely in ATLAS for designing re-interpretable analyses.

Key Points
Containerized analysis environments allow for fully reproducible code testing and development, with the convenience of working on your local machine.
Fortunately, there are tools to help you automate all of this.
Optional: Running Containers on LXPLUS Using Singularity
Overview
Teaching: 10 min
Exercises: 5 minQuestions
How can I run a container on LXPLUS?
Objectives
Understand some of the differences between Singularity and Docker.
Successfully run a custom analysis container on LXPLUS.
Introduction
Analysis containers allow software development to occur on a local computer with the only requirement being that Docker is installed. The same containers can be run in GitLab CI/CD via Docker. These containers can also be run on LXPLUS, but this requires some additional steps.
When dealing with Analysis Containers, privileged containers are often needed.
These are not available to you on LXPLUS (nor is the dockercommand).
On LXPLUS, the tool to run containers is Singularity.
The following commands will therefore all be run on LXPLUS
(lxplus7.cern.ch or later specifically).
This lesson will teach the basics of using Singularity to make containers of docker containers, for more information please see the Singularity Documentation.
Running custom images with Singularity
Some of the LHC experiments have scripts for running singularity that hide the complexity. For the purpose of running a custom analysis image, Singularity must be run manually.
As an example, we are going to run a container using the matthewfeickert/intro-to-docker
image. Before running Singularity, you should set the cache directory (i.e.
the directory to which the images are being pulled) to a
place outside your AFS space (here we use the tmp directory):
export SINGULARITY_CACHEDIR="/tmp/$(whoami)/singularity"
singularity shell -B /afs -B /eos -B /cvmfs docker://matthewfeickert/intro-to-docker:latest
# try accessing cvmfs inside of the container
source /cvmfs/cms.cern.ch/cmsset_default.sh
If you are asked for a docker username and password, just hit enter twice.
One particular difference from Docker is that the image
name needs to be prepended by docker:// to tell Singularity that this
is a Docker image.
As you can see from the output, Singularity first downloads the layers
from the registry, and is then unpacking the layers into a format that
can be read by Singularity. This is somewhat a technical detail, but
is different from Docker.
In the next example, we are executing a script with singularity using a Docker CERN Cent0S 7 image.
export SINGULARITY_CACHEDIR="/tmp/$(whoami)/singularity"
singularity exec -B /afs -B /eos -B /cvmfs docker://matthewfeickert/intro-to-docker:latest bash /cvmfs/cms.cern.ch/cmsset_default.sh
execvs.shellSingularity differentiates between providing you with an interactive shell (
singularity shell) and executing scripts non-interactively (singularity exec).
-B(bind strings)The -B option allows the user to specify paths to bind to the Singularity container. This option is similar to ‘-v’ in docker. By default paths are mounted as rw (read/write), but can also be specified as ro (read-only).
Authentication with Singularity
In case your image is not public, you can authenticate to
the registry in two different ways: either you append the
option --docker-login to the singularity command, which
makes sense when running interactively, or via environment
variables (e.g. on GitLab):
export SINGULARITY_DOCKER_USERNAME=${CERNUSER}
export SINGULARITY_DOCKER_PASSWORD='mysecretpass'
Exercise (5 min)
Working from lxplus, use Singularity to pull the Docker image created in lesson 8 for the skimming repository and use this image to start an interactive Singularity container.
Solution
export SINGULARITY_CACHEDIR="/tmp/$(whoami)/singularity"
singularity shell -B /afs -B /eos -B /cvmfs --docker-login docker://gitlab-registry.cern.ch/[repo owner's username]/[skimming repo name]:[branch name]-[shortened commit SHA]
Notice
This page shows only a little taste of Singularity. For more information visit our Singularity training module
Key Points
Singularity needs to be used for running containers on LXPLUS.
To run your own container, you need to run Singularity manually.
Bonus: Using CMD and ENTRYPOINT in Dockerfiles
Overview
Teaching: 0 min
Exercises: 0 minQuestions
How are default commands set in Dockerfiles?
Objectives
Learn how and when to use
CMDLearn how and when to use
ENTRYPOINT
So far every time we’ve run the Docker containers we’ve typed
docker run --rm -it <IMAGE>:<TAG> <command>
like
docker run --rm -it python:3.7-slim /bin/bash
Running this dumps us into a Bash session
echo $SHELL
SHELL=/bin/bash
However, if no /bin/bash is given then you are placed inside the Python 3.7 REPL.
docker run --rm -it python:3.7-slim
Python 3.7.4 (default, Jul 13 2019, 14:04:11)
[GCC 8.3.0] on linux
Type "help", "copyright", "credits" or "license" for more information.
>>>
These are very different behaviors, so let’s understand what is happening.
The Python 3.7 Docker image has a default command that runs when the container is executed,
which is specified in the Dockerfile with CMD.
Create a file named Dockerfile.defaults
touch Dockerfile.defaults
# Dockerfile.defaults
# Make the base image configurable
ARG BASE_IMAGE=python:3.7-slim
FROM ${BASE_IMAGE}
USER root
RUN apt-get -qq -y update && \
    apt-get -qq -y upgrade && \
    apt-get -y autoclean && \
    apt-get -y autoremove && \
    rm -rf /var/lib/apt-get/lists/*
# Create user "docker"
RUN useradd -m docker && \
    cp /root/.bashrc /home/docker/ && \
    mkdir /home/docker/data && \
    chown -R --from=root docker /home/docker
ENV HOME /home/docker
WORKDIR ${HOME}/data
USER docker

CMD ["/bin/bash"]
Now build the dockerfile, specifying its name with the -f argument since docker will otherwise look for a file named Dockerfile by default.
docker build -f Dockerfile.defaults -t defaults-example:latest .
Now running
docker run --rm -it defaults-example:latest
again drops you into a Bash shell as specified by CMD.
As has already been seen, CMD can be overridden by giving a command after the image
docker run --rm -it defaults-example:latest python3
The ENTRYPOINT builder command allows to define a command or
commands that are always run at the “entry” to the Docker container.
If an ENTRYPOINT has been defined then CMD provides optional inputs to the ENTRYPOINT.
# entrypoint.sh
#!/usr/bin/env bash

set -e

function main() {
    if [[ $# -eq 0 ]]; then
        printf "\nHello, World!\n"
    else
        printf "\nHello, %s!\n" "${1}"
    fi
}

main "$@"

/bin/bash
# Dockerfile.defaults
# Make the base image configurable
ARG BASE_IMAGE=python:3.7-slim
FROM ${BASE_IMAGE}
USER root
RUN apt-get -qq -y update && \
    apt-get -qq -y upgrade && \
    apt-get -y autoclean && \
    apt-get -y autoremove && \
    rm -rf /var/lib/apt-get/lists/*
# Create user "docker"
RUN useradd -m docker && \
    cp /root/.bashrc /home/docker/ && \
    mkdir /home/docker/data && \
    chown -R --from=root docker /home/docker
ENV HOME /home/docker
WORKDIR ${HOME}/data
USER docker

COPY entrypoint.sh $HOME/entrypoint.sh
ENTRYPOINT ["/bin/bash", "/home/docker/entrypoint.sh"]
CMD ["Docker"]
docker build -f Dockerfile.defaults -t defaults-example:latest --compress .
So now
docker run --rm -it defaults-example:latest
Hello, Docker!
docker@2a99ffabb512:~/data$
Applied
ENTRYPOINTandCMDWhat will be the output of
docker run --rm -it defaults-example:latest $USERand why?
Solution
Hello, <your user name>!
docker@2a99ffabb512:~/data$
$USERis evaluated and then overrides the defaultCMDto be passed toentrypoint.sh
Key Points
CMDprovide defaults for an executing container
CMDcan provide options forENTRYPOINT
ENTRYPOINTallows you to configure commands that will always run for an executing container
Bonus Episode: Building and deploying a Docker container to Github Packages
Overview
Teaching: 40 min
Exercises: 0 minQuestions
How to build a Docker container for python packages?
How to share Docker images?
Objectives
To be able to build a Docker container and share it via GitHub packages
Prerequisites
For this lesson, you will need,
- Knowledge of Git SW Carpentry Git-Novice Lesson
- Knowledge of GitHub CI/CD HSF Github CI/CD Lesson
Docker Container for python packages
Python packages can be installed using a Docker image. The following example illustrates how to write a Dockerfile for building an image containing python packages.
FROM ubuntu:20.04

ENV DEBIAN_FRONTEND=noninteractive

RUN apt-get update \
 && apt-get install wget -y \
 && apt-get install dpkg-dev cmake g++ gcc binutils libx11-dev libxpm-dev \
  libxft-dev libxext-dev python3 libssl-dev libgsl0-dev libtiff-dev \
  python3-pip -y

 RUN pip3 install numpy \
  && pip3 install awkward \
  && pip3 install uproot4 \
  && pip3 install particle \
  && pip3 install hepunits \
  && pip3 install matplotlib \
  && pip3 install mplhep \
  && pip3 install vector \
  && pip3 install fastjet \
  && pip3 install iminuit
As we see, several packages are installed.
Publish Docker images with GitHub Packages and share them!
It is possible to publish Docker images with GitHub packages. To do so, one needs to use GitHub CI/CD. A step-by-step guide is presented here.
- Step 1: Create a GitHub repository and clone it locally.
- Step 2: In the empty repository, make a folder called
.github/workflows. In this folder we will store the file containing the YAML script for a GitHub workflow, namedDocker-build-deploy.yml(the name doesn’t really matter). - Step 3: In the top directory of your GitHub repository, create a file named
Dockerfile. - Step 4: Copy-paste the content above and add it to the Dockerfile. (In principle it is possible to build this image locally, but we will not do that here, as we wish to build it with GitHub CI/CD).
- Step 5: In the
Docker-build-deploy.ymlfile, add the following content:
name: Create and publish a Docker image

on:
  push:
    branches:
      - main
      - master

env:
  REGISTRY: ghcr.io
  IMAGE_NAME: ${{ github.repository }}

jobs:
  build-and-push-image:
    runs-on: ubuntu-latest

    permissions:
      contents: read
      packages: write

    steps:
      - name: Checkout repository
        uses: actions/checkout@v4

      - name: Log in to the Container registry
        uses: docker/login-action@v3
        with:
          registry: ${{ env.REGISTRY }}
          username: ${{ github.actor }}
          password: ${{ secrets.GITHUB_TOKEN }}

      - name: Docker Metadata
        id: meta
        uses: docker/metadata-action@v5
        with:
          images: ${{ env.REGISTRY }}/${{ env.IMAGE_NAME }}

      - name: Build and push Docker image
        uses: docker/build-push-action@v5
        with:
          context: .
          push: true
          tags: ${{ steps.meta.outputs.tags }}
          labels: ${{ steps.meta.outputs.labels }}
The above script is designed to build and publish a Docker image with GitHub packages.
- Step 6: Add LICENSE and README as recommended in the SW Carpentry Git-Novice Lesson, and then the repository is good to go.
Key Points
Python packages can be installed in Docker images along with ubuntu packages.
It is possible to publish and share Docker images over github packages.